Showing posts with label Progress. Show all posts

Monday, 13 February 2012

Sentinel 7109 Cab Roof

On arrival in 2004, the cab roof was (to say the least) leaking! A new panel has been purchased and is due for cutting to shape in Summer 2011.
Leaking roof!
Roof support girder before detachment from the old roof
The cab roof support girders have been refitted and roof edging plates have been derusted to put them back into shape.  Rust had got into confined spaces and forced things apart such that the new roof would not lie as it should. New rain channels have been fitted.
7109 playing in the snow boxing day 2010
The cab roof was hoped to be completed late 2010 but the snow and cold from the start of December put paid to that!

Tuesday, 13 December 2011

Season's Greetings...

...and thank you for being interested in the restoration of Sentinel 7109 "Joyce". I'll do my best to keep up the 'blog's standard in 2012!
At 83, young Joyce playing in the snow on Boxing Day 2010
(I must make some Xmas cards with this photo for next year)
When I began the 'blog in May this year, I wasn't sure how it would develop and how it might affect progress with the restoration activities. In actual fact, the restoration has fed the 'blog and the 'blog has fed the restoration giving each activity a feeling that it is complete when lodged in the blogosphere.

I've also found that visitors to Midsomer Norton Station are starting to ask me more informed and searching questions lately (who's leaking the information, I wonder?). I even get a few 'blog comments, some sensible, some humorous. I'll leave you to figure out which fall into which category!

There is probably not much more to blog in 2011 but you never know. The weather has decided to cool it emphatically and contact with cold metal drains body heat in no time through gloves, footwear and clothing; not a pleasant experience.

The arrival of the DMU at Midsomer Norton has left Joyce isolated in the platform opposite the maintenance facilities of the goods' shed. Much anticipated activity has had to take a back seat and, after three weeks, I'm still waiting to turn the engines on compressed air to splash the gloppy crankcase oil about in the lower gear cases. Hopefully, when Santa has been and gone, normality will return and more progress can be made.

2012 should see Sentinel 7109 in steam again for the first time since the 1960s. There's still a long way to go but most of the major subsystems' restoration has been sorted and, when circumstances allow, it will be more a matter of bolting all the bits together and lighting the fire than the endless grinding away at rust and debris ("How naive", did I hear someone say!).

Have a good break and hope to see some of you as visitors to Midsomer Norton Station in the new year.

PS If you find yourself bored over the break whilst waiting for the next posting, why not have a look at Douglas Self's 'Unusual Locomotives' web page. It's rather short on UK Sentinels at the moment, however, hopefully that won't always be the case!

Tuesday, 27 September 2011

Sentinel 7109's Lower Gear Housings

Since July 2011 (now September), I've taken some better photos for this article so here's the new 'enhanced' version!

Three new inspection bolts have been made for the level check holes in the lower gear housings.

Inspection bolt with blind axial hole and linked radial aperture
for oil level checking
The bolt is partly removed to check if oil comes out of the radial aperture
View from above
So why three level check holes and not just one? Simply, it depends on the size of the gear wheel inside. Sentinel offered the ability to change the gear ratio to suit each customer's haulage and speed requirements.

7109 was set up for slow, heavy haulage (I'm guessing here but it will be obvious in due course); hence it will have a large gear in the lower gear case. As a result, it will not need such a deep oil bath as one set up for higher speed with a smaller gear in the same place. So the the check hole actually used will be to suit the expected oil level inside.

Going off-subject for a moment, the Teifi Valley Railway visit on 18th September 2011 revealed an interesting angle on this with the double geared Sentinel 9622 built in 1958. Have a look at the next two photos:
Near side lower gear casing (9622)
Off side lower gear casing (9622)
Note that the drain cock (posh way of doing it) on the near side is on the middle level whereas, on the off side, the drain cock is on the top level. At first, this seems to be a mistake; however, it is a double geared loco with different sized gears in the near and off side casings. Hence a different oil level is needed for each. (It's inevitable that however many photos are taken at the time, something else needs to be illustrated when the time comes. Anyway, hopefully these are just about good enough to illustrate the point).

Also noteworthy in the 9622 photos is that bolts rather than studs/nuts are used to fix the plate in place.

Does anybody know what that big nut-like thing is in the middle of each cover plate? I guess it's a means of draining condensate from the gear case but it was so covered in green slime and it was raining hard that day so I didn't feel much like crawling about underneath and cleaning it up to find out!

A final noteworthy point: in the bottom right of the off side photo can be seen a drive chain. 9622 has double width chains whereas 7109 has single. The double chains would have been used for extra strength as, with double gearing, the drive would be only via the left or right hand chain depending on whether high or low gear was selected. 7109 has one single width chain per engine.

Back to 7109: the new gear housing bottom plates are under construction in preparation for crankcase oil to be added. Hopefully the oil will dampen the unceremonious 'clanking' heard when running on compressed air without a load.
The bottom plate goes here
Crankcase oil is a special type designed for Sentinel steam engines. Its specific characteristic is that water condensate separates out and sinks to the bottom easily for draining off.
Definitely Crankcase oil required!
When fitting 7109's gear case bottom plates, a gasket will be required between the plate and the housing. Hexagonal headed screws will need to be used with fibre washers to hold it in place as some of the holes into the housing are open to the oil contained within; without fibre washers and fixed-head screws, the oil will be able to seep out via the thread in the housing and the thread in the nut and possibly also between the nut and the bottom plate.

Saturday, 20 August 2011

Cab Repaint

Wednesday 10th August 2011 saw more work to tidy up the cab before parts become inaccessible with the boiler reinstated.

Red paint is now getting everywhere...

...Left....
...Right and...
...Centre!
And who's idea was it to do a 'Banksy' of a road railer on the RH window?
Progress continues!

Friday, 15 July 2011

Trailing Engine's Boiler Feed Pump

Whilst I had first run Sentinel 7109's engines on compressed air on 26th July 2009 and on subsequent occasions, I had not checked whether the Boiler Feed Pump (BFP) attached to each engine was in working order. Having renovated the Worthington-Simpson BFP, I was now much better prepared as to what I would find.

Engine BFP in-situ
Both leading and trailing engine BFPs look the same.

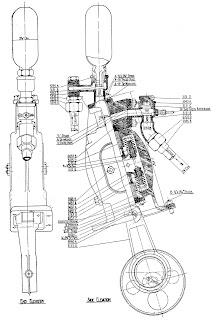
Part cut-away drawing
The cut-away shows that the pump is a reciprocating type driven from the crankshaft (or geared from the crankshaft).

Inlet (RH) and outlet (Left centre)valves
Access to the pump piston was not attempted as it would involve breaking and damaging one or more gaskets. From the Worthington-Simpson BFP piston design, I expect a similar multi-ringed piston forced on to the cylinder wall by the pressure of the water being pumped. I may be proved wrong! I was more interested in the condition of the inlet and outlet valves and how they were constructed.

Inlet valve to the right
Outlet valve below the 'bulb'

Inlet Valve

Cap on inlet valve chamber
Cap removed to show inner valve cap
Inner valve cap removed to show the valve itself on its seat
Valve removed to show its seat
Valve itself showing a clean surface
Valve seat in reasonable condition but would benefit from regrinding

Outlet Valve

'Bulb' instead of cap on valve body
The bulb is initially filled with air and provides a cushion to the pulsations of the reciprocating pump. It is similar in effect to a smoothing capacitor in an electronic circuit power supply.

Base of 'bulb' (just about) showing valve internals
Valve on seat with washer on top
I'm not sure of the purpose of the washer; however, it must prevent the valve from fully lifting and thus restricting the maximum flow. To me, it seems as if this might put an extra load on the engine for no apparent good reason - unless somebody knows better? It might also prevent the valve from coming out of its location but Sentinel were better valve designers than that weren't they?

Valve on seat with washer removed
Valve removed with washer in place on top
Valve seat slightly corroded (green)
and needing improvement by regrinding

Thursday, 14 July 2011

Cab repaint - A bit of a blow!

Before the boiler is put back into the cab, the surrounding paintwork needs improvement particularly behind the boiler where it will eventually be inaccessible. This was expected to be a quick job but soon took on surprising proportions.

Initially, angle grinders and radial wire brushes were used to good effect on the cab floor. Also on YouTube

Bit of a grind
Then the cab wall revealed a strange effect. A compressed air jet was being used to disperse the settled dust but was found to be also particularly effective at blowing off the paint from the cab walls! (Also on YouTube).

Bit of a blow!
Whether this was due to the particular paint used previously or poor preparation of the underlying surface at the time is hard to say. However, the paint was clearly keener to come off than stay on!

Looking better already - all four boiler support areas are visible
By the end of the day, although not completed, the cab floor was beginning to look a lot better than at the start. To be continued.

Wednesday, 13 July 2011

Sentinel 7109's whistle valve and how does it work?

A peculiar looking valve had been hanging around Sentinel 7109's stores looking for a use. Eventually, I was advised that it was a whistle valve.

Grubby looking thing!
Alternative view
With mounting flange and whistle-mounting elbow
Whistle valve roof-mounted in Isebrook
Whistle valve roof-mounted in William
Unlike Isebrook and William, Sentinel 7109 has the whistle and valve mounted vertically on the cab front.

Front-mounted whistle (the valve is inside)
So how does a whistle valve work and how does it enable the 'pop' action needed for the whistle?

Functional Parts
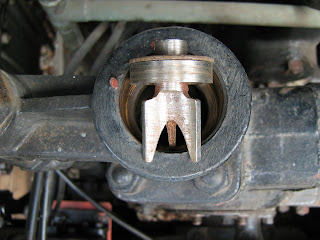
The main valve body allows steam in through the top right connection where the air-hose adaptor is shown here. The steam is held back by a conical valve pressed against a valve seat by a spring and also by the steam pressure.

Conical valve (not to scale!)
Valve seat inside end of valve body
Spring and retainer which screws into the end of the valve body
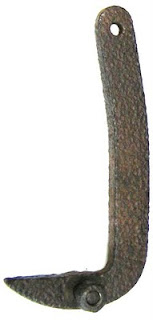
A rod passes through the valve body and rests against the conical valve's base. To sound the whistle, the conical valve is pushed off its seat by the operating lever's movement which pushes the rod against the conical valve's base.

Rod (not much more to say on this!)
Operating lever
The steam can then pass out to the whistle through an aperture in the valve body's flange.
The steam pressure holds the conical valve in place until the lever is used to push it open. This is a sudden action which is also terminated abruptly by the steam forcing the conical valve shut again. Hence the whistle valve enables a quick 'pop' to be achieved as well as the long 'poop'! 
There is one more aperture in the valve body shown with a copper tube attached in the Isebrook valve picture (but, oddly, not on William).

Condensate drain
As a result of the whistle being sounded only occasionally (hopefully), the valve body will generally be cold when steam is admitted. Thus the copper drain tube is added to allow the resulting condensate to be drained away.

When it's all assembled, it looks like this.

Note the elegant MDF cab front substitute and supporting clothes' peg!
Finally, when I first took the valve apart originally for renovation, the conical valve seemed to have a leathery pad between it and the seat. As the pad was in an 'aged' condition, I discarded it wondering where to find a replacement. On subsequent closer examination, it looked as if the conical valve and seat were both in good condition and, after a small amount of regrinding, were clearly perfectly satisfactory. Thus I concluded that either the leathery pad was accumulated muck or was a misguided bodge from the past! Who knows? But it isn't there now!

Tuesday, 12 July 2011

Clean as a Whistle!

When Sentinel 7109 was originally brought to Midsomer Norton Station in December 2004, its whistle was missing. From early pictures of 7109 in service, a tall thin item was required as a replacement.

Tall thin whistle 1
Tall thin whistle 2
Other Sentinel locos seem to have a variety of whistles such as William's but something more authentic to the original was wanted.

William's proud possession
Early July 2011, the ideal thing came up on Ebay and I was the only bidder! Although its fittings were not quite suitable, it seemed as good as was likely to be found (another was offered for £350 which was declined rapidly!).

On arrival, it was tarnished but in good working order and a definite possibility.
Clearly, it once had a sticky label attached
Gun-metal mounting and steam inlet to the left
It's such a simple, passive device, I'm sure I could have made one!
Cap machined from solid gun-metal
To clean off the tarnish, I used a phosphoric acid gel originally used for derusting car bodywork. Finally it was brightened-up by Brillo pad and a french polishing technique known as grisse d'elbeaux.
Shiny and clean as a whistle!
Some say (where've I heard that before?) that the whistle looks like one from an 08 diesel-electric shunter. I checked this out in Brian Haresnape's British Rail Fleet Survey "7 Diesel Shunters". It appears that 08s did have this type but they also had a number of others and horns too. As Sentinels also had this type and others, I'm sure this whistle will do just fine!

Despite many attempts at testing the whistle with compressed air, my neighbours are still talking to me. However, when I put the video below together, it frightened the hell out of the local cats and the next-door dog had a fit!

(Note: I've sometimes had trouble playing the video repeatedly. If this is the case, reload the window (F5 on PCs) and try again). Alternatively, it's here on YouTube.
Related Posts Plugin for WordPress, Blogger...