Tuesday, 24 December 2013

Pipe Dream Come True

Back in April 2013, in a previous article, I wrote about the curved main steam pipe which was to be remade by Mendip Steam Restorations. It was to replace the original one which had been badly damaged by corrosion and pitting of the outer surface.
Original Main Steam Pipe
The replacement finally arrived on Monday 25th November 2013. It had been delivered earlier but found to not quite fit correctly. In the days when 7109 was constructed, there was not such a thing as flexible pipe. As such, the ends to which the curved steam pipe has to fit are fixed in space very precisely; hence the difficulty with making the item. However, on the brighter side, by igniting the first fire in 7109 for many decades, an oxy-propane torch was able to provide the heat to shape the pipe to fit.

Unfortunately, this was not the end of the story. Being a main steam pipe wrapping around the boiler in the cab, it's very close to the driver. Hence it's not a nice thing to have fail at an inappropriate time!

Problems were found with the end fittings such that they could not be examined by X-ray to check the soundness of the welded end flanges. Complete new ends were machined from solid to avoid the necessity for any weld at the mating faces. The new section then had to be welded to the rest of the pipe to a high standard.
Brand-New Main Steam Pipe
It looks in shape very like the old one - which is lucky really!

The original fittings have been salvaged for the new pipe.
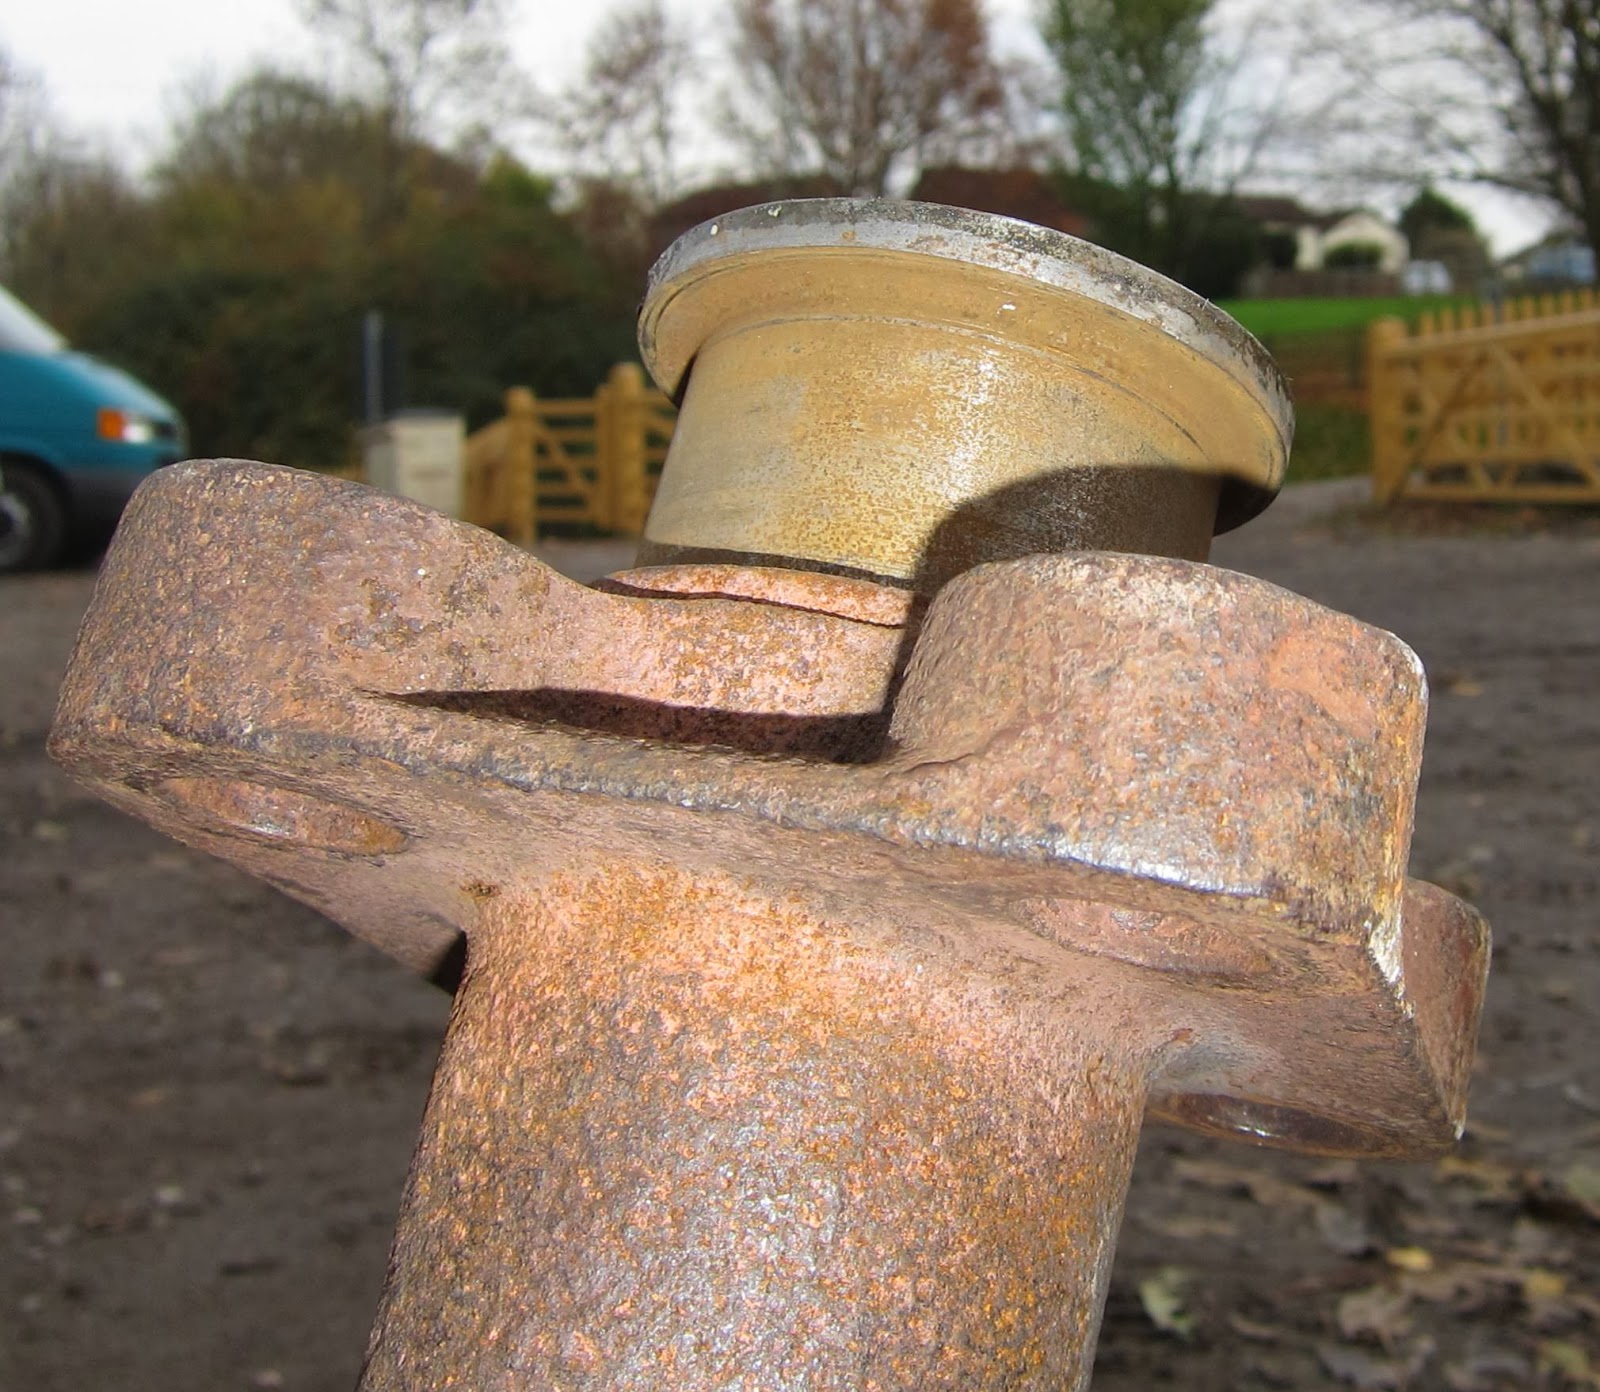
End section and flange machined from solid
Sections have been welded to pressure vessel standards.
One of the very tidy coded welds
My apologies for such a long time since the last blog article - the reason being that I have recently been heavily entrenched in the arrangements and running of the two December steam weekends at Midsomer Norton. We haven't had any steam for some years so it was bound to be a taxing time.
Bristol Harbour Railway's Peckett 0-6-0 'Henbury'
tucked up in Midsomer Norton's Goods' Shed
Much has still been going on behind the scenes with 7109 and I've now received the vacuum brake ejector from the USA (ironically stamped with the word 'China'!). More of that to follow.

Wishing you Seasons' Greetings for Christmas and the new year. 7109 didn't quite steam in 2013 but I have high hopes for 2014.


Thursday, 7 November 2013

Vacuum Braking (4) Design (3)

Having settled on the GL-1 Jet Pump ejector running at 60 psi in Vacuum Braking (3) Design (2), here are the next three challenges:

1. How to connect the Ejector's American NPT threads to UK BSP threads?

2. Selecting a Pressure Reducing Valve to take the 275 psi boiler pressure down to 60 psi for the ejector.

3. Selecting a Vacuum Relief Valve for making sure that the Jet Pump does not draw more than 21" Hg of vacuum.


1. The GL-1 Jet Pump Ejector has a 3/4" steam inlet pipe thread and 1" exhaust and suction pipe threads. The trouble is that the American NPT and British BSP threads are not generally compatible and Sentinel 7109 uses BSP threads.

There are two challenges here: the pipe threads themselves and the need to be able to assemble and disassemble the ejector from the rest of the pipework. Initially, I'd started to look for simple female NPT to female BSP pipe couplings. However, it occurred to me that, if I could find a pipe fitting supplier with both NPT and BSP threaded unions, the thread linking the union halves might be the same. Thus it would be possible to create a union with NPT thread at one end and BSP at the other.
Mixed NPT-BSP Union halves
After a lot of internet searching, I eventually found Nero Pipeline Connections Ltd who seemed to have what I was looking for in stainless steel. I rang Nero and a very helpful Daryl offered to go and actually try a NPT and BSP union together. He rang back proclaiming a success with a proviso that I might have to do a little fitting to ensure a good seal between the dissimilar union halves. This was the sort of service I needed and have been able to obtain what I needed as in the photo above. Having tried the dissimilar halves together, there does not seem to be any need to persuade them to fit with each other.

2. The Pressure Reducing Valve not only has to drop the boiler pressure from 275 to 60 psi to suit the ejector but it also has to be able to let enough steam through for the ejector to do its job (and possibly a bigger ejector if ever needed).

I'd been guided towards Spirax Sarco as a suitable supplier partly because Gervase was already using one successfully but also because another Sentinel had a different type which had the persistent habit of blowing a continuous Raspberry! This was not a particularly attractive feature and one which was worth avoiding if possible (I'll diplomatically not say which Sentinel has this feature!).
Spirax Sarco BRV2S rated at 276 psi and 212 Deg C.
with Orange hat.
The beast is in the photo above. It arrived very quickly from BSS in Gloucester, UK.
Two optional features had to be chosen:
(1) To ensure sufficient steam flow was possible, I chose a 1/2" type easily capable of supporting a GL-1 ejector and even a much bigger GL-2 if found to be needed later.
(2) To be able to set the 60 psi outlet pressure, I chose an 'orange' rated spring allowing a range from 3.5 to 8.6 bar (60 psi = 4.1 bar).

The full specification of the BRV2S can be found here.

3. The Vacuum Relief Valve has to let air into the vacuum pipework when the 21" Hg level is reached. It also has to be able to let more air in than the ejector can pump out so there is a size factor too.

It took me a long time to find a supplier of a suitable device. Eventually, I found Flowstar of Kingston upon Hull, UK, who distribute products made in Hamburg, Germany, by Niezgodka GmbH. The Type 91, size 1 with a Viton seal and 3/4" male thread fitting is the chosen one.
The Niezgodka VRV data sheet has most of the detail while an additional data sheet covers the discharge capacity (2nd column under '18'). Note: 1 cu metre = 35.3 cu feet).
The size 1 type is good for 50 cu metres/hour = 29.6 cu feet/minute. (I enquired about the empty cells in the discharge capacity table and, for the size 1, 50 cu metres/hour also applies at greater vacuum levels than -0.6 bar). 29.6 cu feet/minute is plenty to overcome the suction possible from a GL-1 ejector or a GL-2 should it ever be necessary. So at least I won't have to replace all the parts should I find I need a larger ejector after all!
Niezgodka Type 91, size 1
Note: the Penberthy Technical Data Manual (page 9) shows a graph which indicates that a GL-1.5 ejector running on 60 psi is capable of 13.5 cu feet/minute at a suction pressure of 21" Hg gauge (= 9" Hg Abs.). Therefore it is safe to assume that a GL-1's capacity will be less than 13.5 because it is smaller. A GL-2 is not twice the size of a GL-1.5 so the 29.6 cu feet/minute of the VRV will be more than a GL-2 can remove.

Next, I'll look at the boiler's isolation valve, the reason why a curvaceous syphon pipe is used with a steam pressure gauge and possibly at the driver's brake valve.

Friday, 1 November 2013

Vacuum Braking (3) Design (2)

Having laid down the requirements and played with some design ideas, now it's time to start making some decisions and begin the shopping.

The decision from which follows all the other design choices is the size and capacity of the Vacuum Ejector (Jet Pump).

I've decided to use a bronze Penberthy GL-1 Jet Pump operating at 60 psi and which has a vacuum pipe of 1" nominal inside diameter. (see pages 8, 9 of the link)

This is why:
Extracted from the Penberthy Jet Pump Technical Data manual, this is the sequence of activities to determine the best item for the job.
Instructions
So step 1 converts our requirement for four Mk1 carriages (16 cu ft/30 secs) into minutes/100 cu ft/min. which equates to 3 minutes/100 cu ft.

For steps 2 & 3, have a look at the table below (also extracted from the Penberthy Jet Pump Technical Data manual (click it to make it readable)):
Jet Pump Selection Chart
This next table of conversions is also needed in step 4 to determine the steam consumption (right hand column above) for Jet Pumps other than a 1.5" size.
Conversion of table figures for non-1.5" Jet Pumps
In the first table, I've highlighted the GL-1 column and the 60 psi 10" Hg Abs. row. (From the table, the GL jet pumps seem to be most efficient at around 60 psi. 10" Hg Abs. is equivalent to 20" Hg gauge which is the nearest figure to the 21" Hg gauge vacuum level to be achieved).
Two columns to the right of my highlight, is a figure of 3.7 for a GL-1.25 jet pump. Although the figure is fairly close to the 3 minutes/100 cu ft required, the GL-1.25 uses 2.9% of the boiler capacity (See Vacuum Braking (2) Design (1)). Whilst 2.9% is OK (135 lbs/hour), a GL-1 uses only 76 lbs/hour or 1.6% of boiler capacity. With these figures, it's worth having a look again at the original requirements.

(The lbs/hour figures come from the right hand column of the first table multiplied by the capacity factor for the size of jet pump in the second table. The first table is normalised for a 1.5" jet pump but converted for other sizes by the capacity factor to avoid having to produce a separate table for each jet pump size, e.g. a GL-1.5 at 60 psi working to give 10" Hg abs. vacuum uses 221 lbs/hour. A smaller GL-1 uses 0.344 x 221 = 76 lbs/hour - only 1.6% of the boiler's 4600 lbs/hour capacity).

Requirement 1 was for four Mk1 carriages, i.e. 16 cu ft of evacuation space in 30 seconds. In fact, 16 cu ft only needs to be evacuated fully when the system has been full of air. Once evacuated and the brakes applied, because the carriage vacuum cylinders are still partly evacuated, the full 16 cu ft volume does not need to be evacuated. Hence the requirement can be relaxed to some extent.

Requirement 1 assumed four Mk1 carriages. At Midsomer Norton, it is very unlikely that as many as four would be involved and two carriages or occasionally three would be nearer the mark.

Thus if two carriages are involved, a smaller GL-1 should be able to evacuate 8 cu ft in 30 seconds and reduce the steam consumption accordingly.

Arguably this is cheating; however, without an original requirement figure, it is very difficult to know what to aim for. Having gone round the calculation loop once, the implications of the requirement have now become apparent and show that there is a good pragmatic case for using a smaller Ejector - particularly if it is being run continuously.

Compared with the Penberthy No. 3 size water lifting ejector having a 1" suction pipe size, the GL-1 has the same suction pipe size but is specially designed for sucking air and not water. So, intuitively, the GL-1 is a similar size to the No. 3 type used on other Sentinels but should perform more efficiently.

Recalculating the figures for two Mk1 carriages with a GL-1 Jet Pump gives a time of around 0.5 minutes to evacuate two carriages whilst using 7.6 gallons of water per hour.

Well! That's the theory anyway.

These Penberthy Jet Pumps are imported by Jenex Ltd of Great Yarmouth, UK. I'm very grateful to Mark Collins of Jenex for helping me to order the right item.

Friday, 11 October 2013

Vacuum Braking (2) Design (1)

In Vacuum Braking (1) Requirements I set out the way I was thinking about approaching Sentinel 7109's vacuum braking system. Here I'll develop my initial design ideas but show that a discussion with a more experienced engineer can reduce time, money and complexity. (Many thanks to Steve Roberts, Engineer, at the Middleton Railway in Leeds).

Firstly, on looking into the symbols needed to draw a system such as this, I found that there was some diversity in websites depicting what I hoped would be a standard. Anyway, these are what I've settled on for subsequent diagrams. (Click on the diagrams to enlarge them).
Diagram Symbols' Definition
I had two ideas which I felt would satisfy requirements 1-4 in Vacuum Braking (1) Requirements. The first is fairly simple, the second more complicated and to get over a potential problem with the first.
Single large ejector
From left to right: the boiler at up to 275 psi feeds a globe valve used to isolate the system when not in use. This feeds a pressure reducing valve to take the pressure down to a level better suited to a vacuum ejector. A pressure gauge is included at this point to measure the setting of the reducing valve.

I've then shown a press-to-open whistle valve to allow steam to the ejector. The idea is that, by using a single large ejector, it can be switched-in and create a vacuum quickly only when required. Thus, a little leakage in vacuum can be overcome by a quick 'blip' on the whistle valve. (More to follow).

The ejector sends its exhaust to atmosphere - preferably via the ash-pan to help reduce clinker formation although it would be more spectacular to send it up through the cab roof!

The ejector's suction port is connected to a swing-flap check valve to maintain the vacuum when the ejector is switched off. Otherwise air could enter the system via the ejector's exhaust port.

Next comes a DMU type of brake valve. This enables the driver to connect the train pipe to the ejector to release the brakes ('Running'), to connect the train pipe to atmosphere to apply the brakes ('On') or to seal the train pipe to hold the braking vacuum at the level set ('Lap').
The brake valve feeds the train pipe where there is a limit valve to ensure that no more than 21" Hg vacuum is generated.
Finally, there is a vacuum gauge to let the driver know what his brakes are doing. They are off above about 18" Hg.

The above seems OK assuming that there is only a small amount of leakage in the train pipe. If the leakage is greater then a second smaller ejector can be added to operate continuously in parallel with the large ejector.
Additional small ejector
The small ejector follows a globe valve used to isolate or reduce the steam supply to the ejector. Another swing-flap check valve follows to enable the ejectors to operate independently.

Given ejectors of suitable capacity, the above possibilities allow the four requirements in Vacuum Braking (1) Requirements to be satisfied. 21" Hg vacuum can be produced in the time required; leakage can be overcome by occasionally 'blipping' the whistle valve; the pressure reducing valve insulates the ejector from lowered boiler pressure and the DMU valve includes the driver's brake valve settings.

All looks good until some better informed experience is added.

At the Middleton Railway, I was shown a vacuum equipped diesel shunter in operation. As a light engine, its vacuum hoses were linked back to 'dummies' to seal them when not in use. With the engine running and the vacuum pulled to 21" Hg, on stopping the engine, the vacuum level dropped to brake-on levels within about 10 seconds - and this was just the engine with no train attached!

The impact of this situation would be that, with the systems above using a whistle valve, the driver would be forever distracted by having to monitor the vacuum gauge and be 'blipping' the brake valve. I doubt if that would be popular with drivers!

The 'Lap' setting of the brake valve would really not be of any use at all. (With air braked systems, 'Lap' works better because leaks are easier to detect and the sealing is of a better, more modern type).

I was also shown a small 0-6-0 steam loco with a single Penberthy No 3 ejector which is operated continuously. To apply the train brakes, air is let into the train pipe even though the ejector is doing its best to suck the air out at the same time! The No. 3 ejector is also satisfactory at pulling the brakes off in a reasonable time on its own (with the brake valve closed, of course!).
Penberthy No 3 Ejector and reducing valve with blue cap
Steam enters via the reducing valve on the right, then through the ejector which exhausts to the ash pan on the left (to dampen the ash). The vacuum train pipe is off the side of the ejector via the elbow pipe joint and to the right.
Vacuum pipe and steam supply
This system is shown in the following diagram (with an added steam pressure gauge).
Middleton Railway influenced Vacuum System
My concern with this simpler idea is the continuous use of steam when in operation. Instinctively, it seems wasteful; however, it may not be the case.

A 1.25" Tyco Penberthy GL type ejector operating at 60 psi uses 135 lbs/hour of steam. Sentinel 7109's boiler is capable of 4600 lbs/hour so the ejector will be using 2.9% of the boiler's maximum output - Not a lot! (Click here for reference information to these figures).

But does this still satisfy the original four requirements?

1. and 2. will be OK given the right choice of ejector.

3. will be unchanged and is a function of the pressure reducing valve.

4. can be dispensed with now that it is clear that considerably more leakage is involved than was originally envisaged. 'Lap' won't hold the vacuum level except with exceptionally well maintained rolling stock - an unlikely luxury to have!

So it looks as if things can be done more simply - time to do some more thinking!

Sunday, 6 October 2013

Vacuum Braking (1) Requirements


Ejector Construction (from Penberthy literature)
Background

As an industrial shunter, Sentinel 7109 never had train braking equipment fitted. However, at Midsomer Norton (MSN), 7109 will be towing passenger trains on occasions and on pretty steep gradients. If I recall correctly, through train braking has been a legal requirement for passenger carrying since the 1870s so it would severely curtail 7109's capabilities if it was omitted!

Heritage passenger rolling stock generally has vacuum rather than air braking and, at MSN, vacuum has been chosen to be the norm. As such, some time ago I committed myself to the Research & Development needed to satisfy this requirement - little did I know what I was getting into!

I'm not going to dwell on how vacuum train braking systems work; it's covered in many places on the internet such as here.

What isn't generally covered is the requirements and design of the locomotive equipment which is what I've been figuring out for the last few weeks (if you were wondering why I haven't published so much 'blog material lately!).

Requirements - what does it have to do?

1. It shall be able to evacuate four Mk1 carriages' braking systems to 21" Hg in 30 seconds.

2. It shall be able to maintain a vacuum level in a leaky system.

3. It shall be able to raise 21" Hg vacuum level at any boiler pressure above 100psi.

4. It shall be able to:
    a. Release the train brakes (Running).
    b. Apply the train brakes (On).
    c. Hold the train brake vacuum level (Lap).

Implications of the requirements

1. 30 seconds is a reasonable time to be able to evacuate a train and pull its brakes off. This is a figure for when there is no remaining vacuum in the carriages. After a brake application, part of the system is still evacuated so the time will be shorter.

21" Hg is the gauge vacuum level for the system.

A Mk1 carriage has a vacuum system volume of about 4 cu ft. Therefore four carriages have about 16 cu ft to be evacuated in 30 seconds. Fewer carriages take less than 30 seconds!

2. Vacuum brake train pipes tend to leak so that, having developed a vacuum level, the level will often reduce allowing the brakes to come on unintentionally (it's a fail safe system). Thus a means of continually sucking a vacuum is helpful.

GWR locos use a piston vacuum pump which can be heard giving a 'Phut' for each rotation of the driving wheels. Other locos use a large ejector to get the brakes off quickly and a smaller ejector to maintain the vacuum.

It is also feasible to use only a single large ejector to take the brakes off and to maintain the vacuum by only activating it when needed. Being large, it does not have to be used for long periods so it will react fast but won't consume any steam when it is inactive. This is the solution I am minded to use but with the possibility of adding a smaller ejector in parallel if the single ejector isn't satisfactory.

3. If boiler pressure is falling, the last thing wanted is for the brakes to also start to coming on. Thus, it is wise to design the ejector system to operate at a controlled lower pressure, e.g. 80-100 psi. The boiler pressure can then fall to around 80-100 psi before the brakes are affected.

4. These functions are provided by a brake valve having 'Running', 'Lap' and 'On' settings. The ejector system will only be linked to the train pipe when in the released position.

Design Investigation

I began by contacting others in the Sentinel loco community who had worked on similar systems. To create the vacuum, it seemed that all had used Penberthy water lifting ejectors of various sizes and with a greater or lesser success. The amount of design information on these did not seem sufficient to make informed design decisions. In one case, the realisation that the ejectors were designed for water lifting had led to an internal redesign of the nozzle geometry - with some improvement. (See the diagram above for the general shape of an ejector).

Using the internet, I searched for Penberthy and found that they are an American company very much in business supporting other vacuum applications such as vacuum packaging and process industries. 'Ejector' now seems to be re-branded under the name 'Jet Pump' for possibly obvious reasons.

Jet Pumps come in a number of varieties and capacities. For 7109's purposes, it needs to be a steam pumping gas (air) type as opposed to liquid pumping of liquids, solids or gases - they're clever little devices (and some not so little)! I found a very useful application guide to Jet Pumps here.

It would seem that either a type GH or GL will be suitable.

More (lots) to follow.
Related Posts Plugin for WordPress, Blogger...